Godot Doctor 👨🏻⚕️🩺
A powerful validation plugin for Godot that catches errors before they reach
runtime. Validate scenes, nodes, and resources using a declarative, test-driven
approach, in either gdscript or C#. No @tool required!
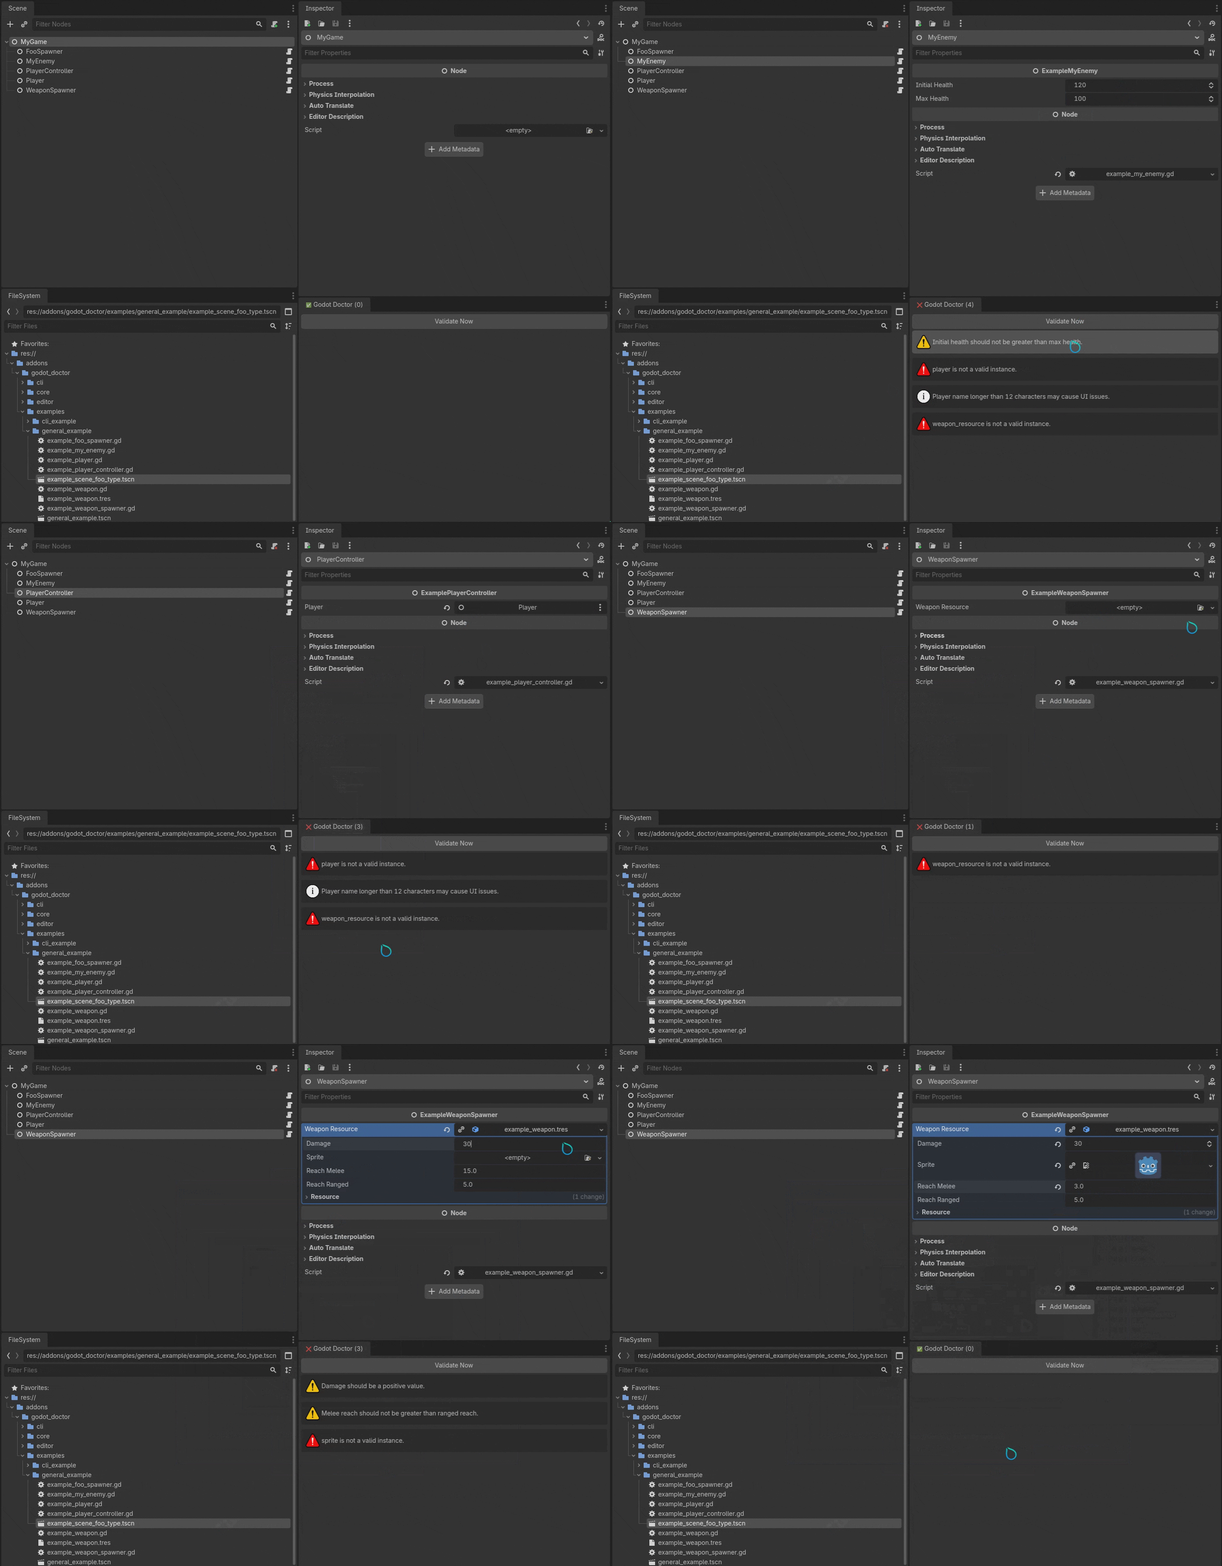
See Godot Doctor in action:
Quickstart 🚀
You can download Godot Doctor directly from the Editor through the Asset Library or Asset Store.
Or, by manual installation:
- Download the source code .zip from the latest release.
- Copy the
addons/godot_doctorfolder to your project'saddons/directory. (Optional:) If you don't useC#in your project, you can safely delete theaddons/godot_doctor/core/csharpand theaddons/godot_doctor/examples/csharpdirectories. - Enable the plugin in Project Settings > Plugins
- (Optional:) Adjust the settings asset in
addons/godot_doctor/settings.
Table of contents
- What is Godot Doctor?
- Why Use Godot Doctor?
- Syntax
- Running Godot Doctor on the CLI
- How it works
- Examples
- Installation
- License
- Attribution
What is Godot Doctor?
Godot Doctor is a Godot plugin that validates your scenes and nodes using a declarative, test-driven approach. Instead of writing procedural warning code, you define validation conditions using callables that focus on validation logic first, with error messages as metadata.
Why use Godot Doctor?
No-code default validations
Realistically, when you add any @export variables, you don't want them to stay
unassigned. Nor do you want to @export a string only for it to stay empty. But
we often forget to assign a value to these. So, new in Godot Doctor v1.1 are
default validation conditions:
Godot Doctor will validate any nodes that have scripts attached to them (and any
opened resource), scan it's @export properties, and automatically reports on
unassigned objects and empty strings, without even needing to write a single
line of validation code!
ℹ️ You can turn off default validations alltogether in the settings asset, or you can add scripts to the ignore list, which will only disable default validations for those specific scripts.
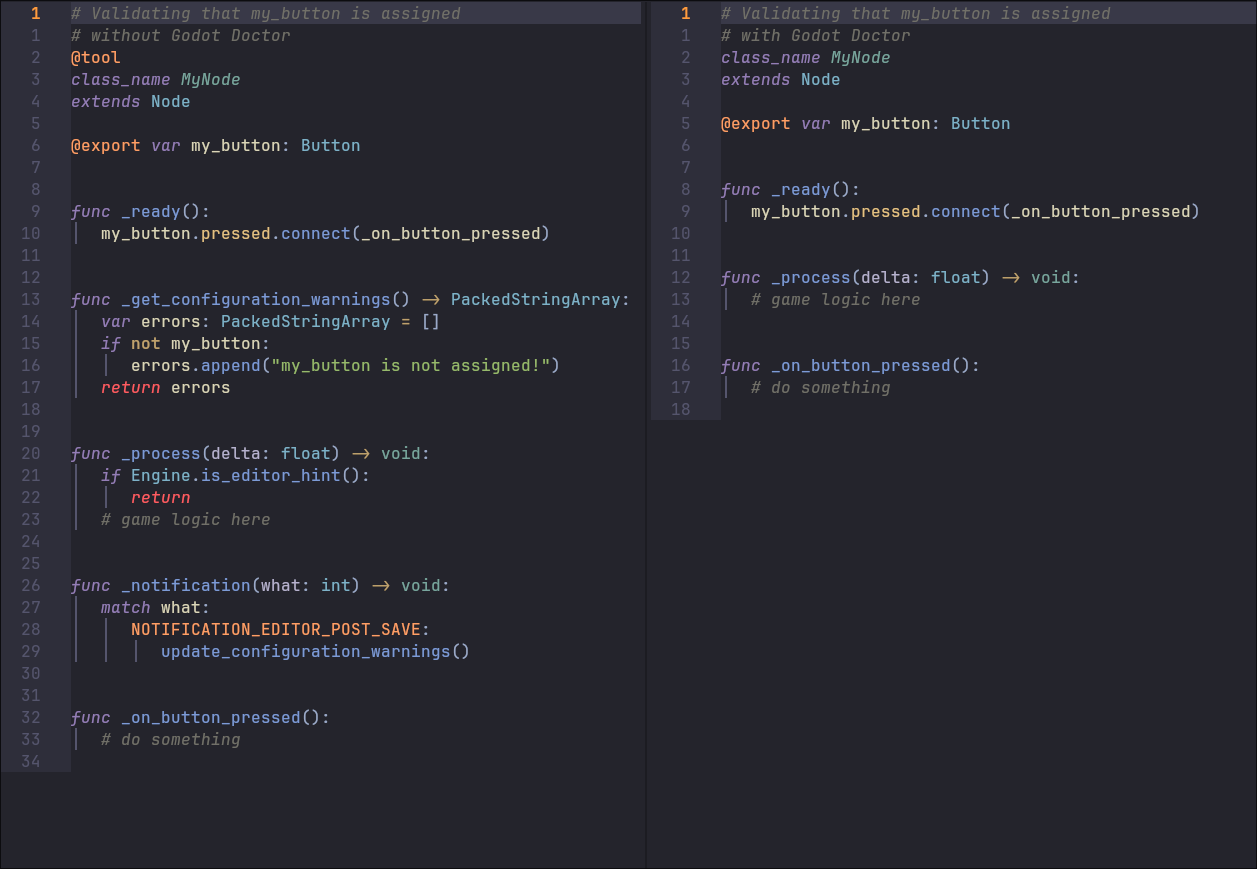
No @tool required
Unlike
_get_configuration_warnings(),
Godot Doctor works without requiring the
@tool
annotation on your scripts. This means that you no longer have to worry about
your gameplay code being muddied by editor-specific logic.
See the difference for yourself:
Or how about this:
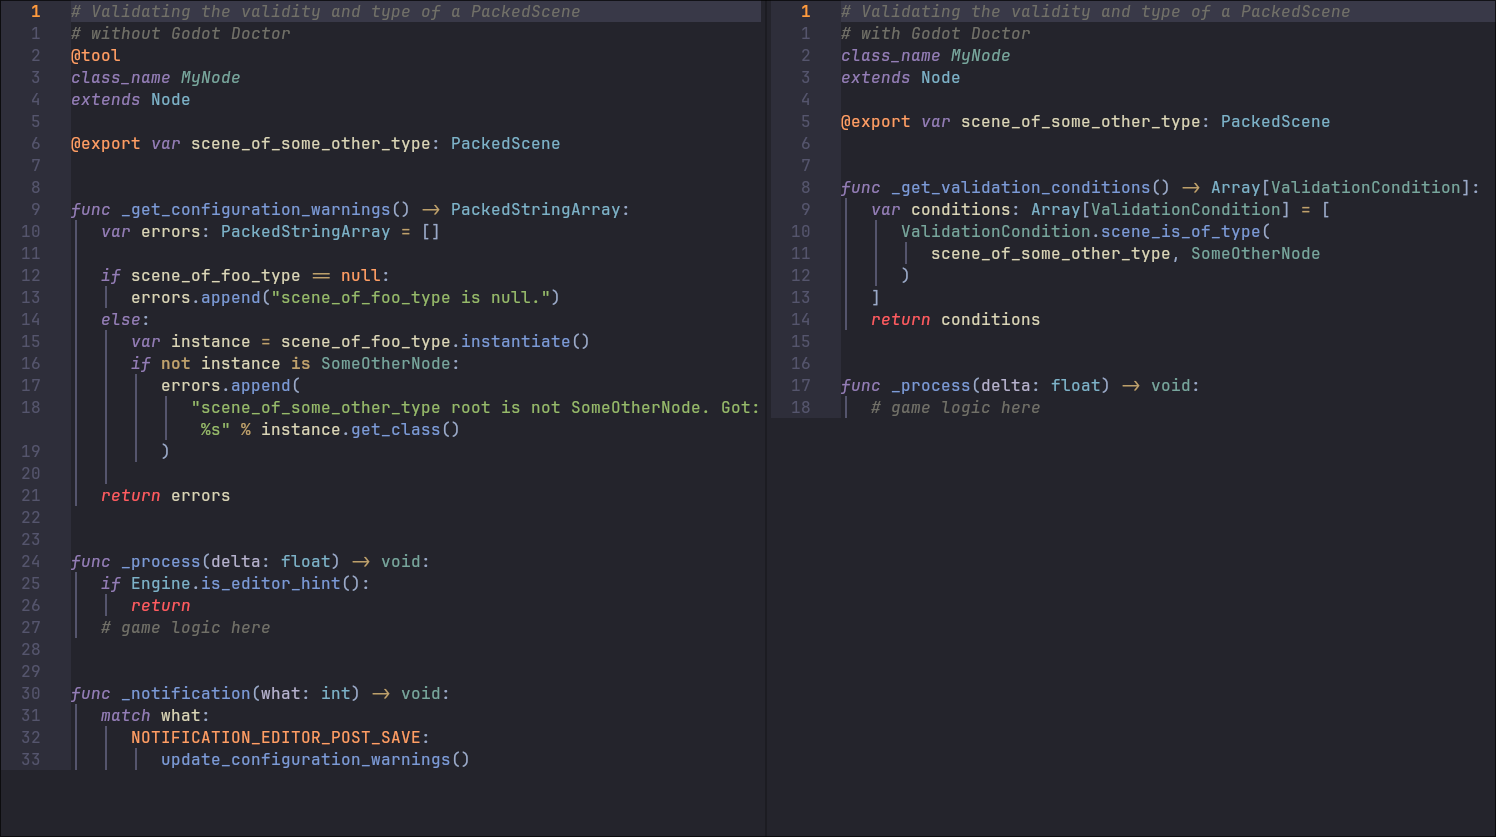
Our gameplay code stays much more clean and focused!
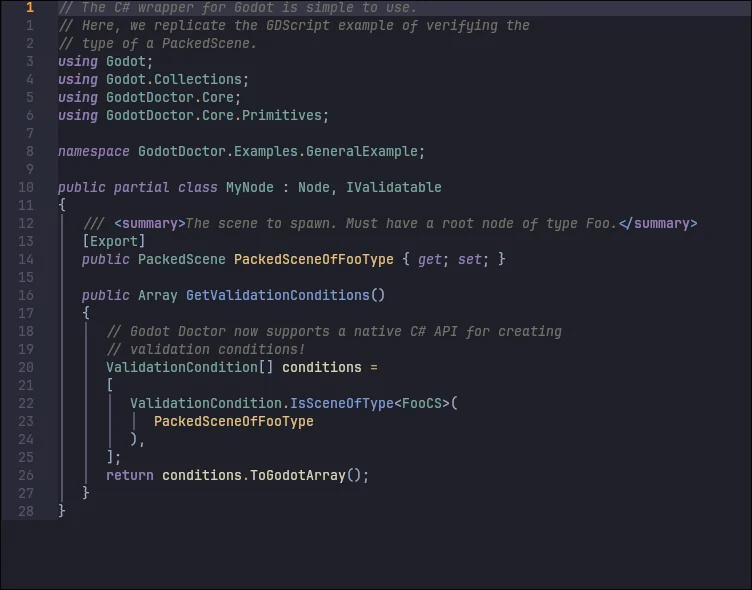
Verify type of PackedScene
Godot has a problem with PackedScene type safety.
We can not strongly type PackedScenes.
This means that you may want to instantiate a scene that represents a Friend,
but accidentally assign an Enemy scene instead. Oops! Godot Doctor can
validate the type of a PackedScene, ensuring that the root of the scene that
you are instancing is of the expected type (e.g. has a script attached of that
type), before you even run the game.
GDscript:
## Example: A validation condition that checks whether the `PackedScene`
##          variable `scene_of_foo_type` is of type `Foo`.
ValidationCondition.is_scene_of_type(scene_of_foo_type, Foo)
C#:
// Example: A validation condition that checks whether the `PackedScene`
// variable `PackedSceneOfFooType` is of type `Foo`.
ValidationCondition.IsSceneOfType<Foo>(PackedSceneOfFooType)
Automatic scene validation
Validations run automatically when you save scenes, providing immediate feedback during development. Errors are displayed in a dedicated dock, and you can click on them to navigate directly to the problematic nodes.
Validate nodes and resources
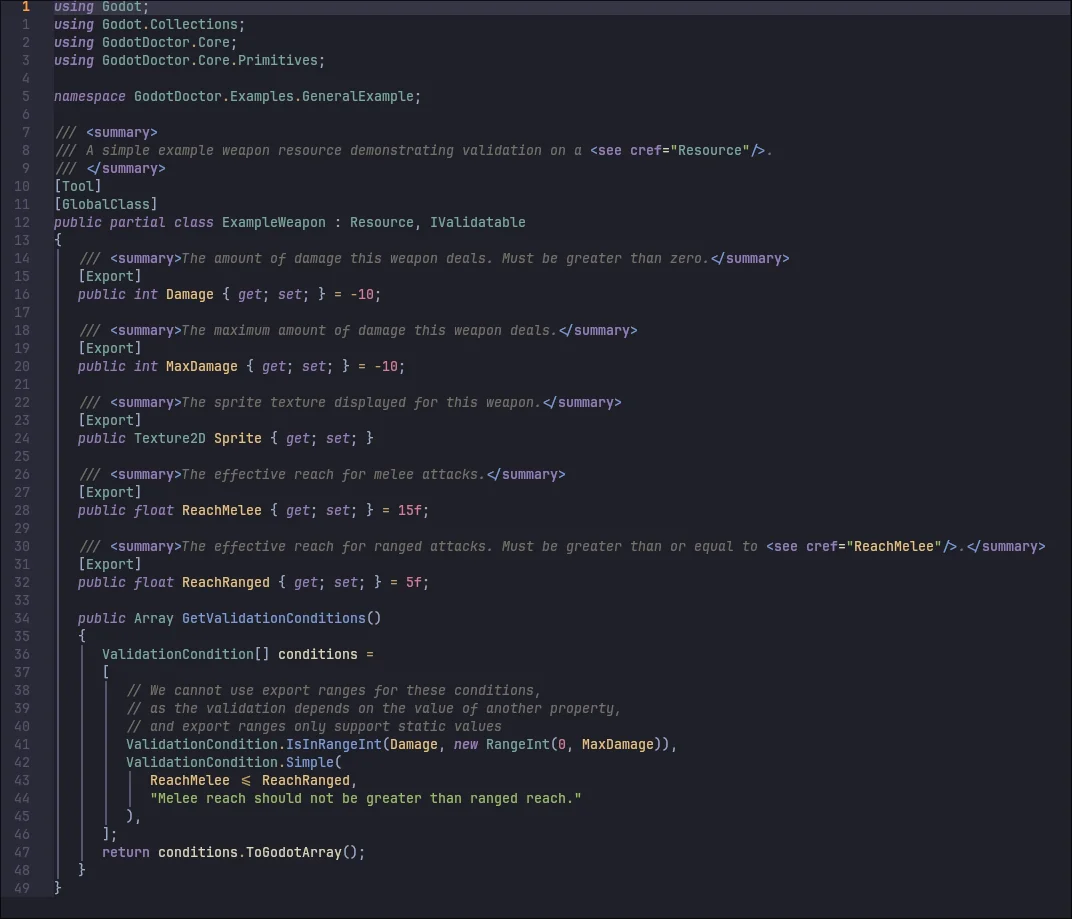
Godot Doctor can not only validate nodes in your scene, but Resource scripts
can define their own validation conditions as well. Very useful for validating
whether your resources have conflicting data (i.e. a value that is higher than
the maximum value), or missing references (i.e. an empty string, or a missing
texture).
Test-driven validation
Godot Doctor encourages you to write validation logic that resembles unit tests rather than write code that returns strings containing warnings. This encourages:
- Testable validation logic
- Organized code
- Better maintainability
- Human-readable validation conditions
- Separation of concerns between validation logic and error messages
Declarative syntax
Where _get_configuration_warnings() makes you write code that generates
strings, Godot Doctor lets you design your validation logic separately from the
error messages, making it easier to read and maintain.
Syntax
GDscript:
Just add a _get_validation_conditions() method script that returns an array of
ValidationCondition objects to any .gd script:
func _get_validation_conditions() -> Array[ValidationCondition]:
  return [
    ValidationCondition.new(
      func(): return health > 0,
      "Health must be greater than 0"
    ),
    ValidationCondition.simple(
      health > 0,
      "Health must be greater than 0"
    ),
    ValidationCondition.is_scene_of_type(scene_of_foo_type, Foo)
  ]
Note: You do not need to add @tool to Node scripts for this to work, so you
can keep your gameplay code clean and focused! However, if you want to validate
a Resource script, you _will_ need to add @tool to that script, due to
engine limitations. However, Resource scripts don't need to be guarded against
running editor code in runtime, so the @tool annotation should be all you
need.
C#:
Implement the IValidatable interface and a public implementation of the
GetValidationConditions() method that returns a Godot.Collections.Array.
(This interface is optional, but it makes it easier to implement consistently).
Create an System.Array<ValidationCondition> of
GodotDoctor.Core.Primitives.ValidationCondition objects, then convert it to a
Godot.Collections.Array using the ToGodotArray() extension method:
public Array GetValidationConditions()
{
   ValidationCondition[] conditions =
   [
      new ValidationCondition(
         () => InitialHealth > 0,
         "Initial health must be greater than 0"
      ),
      ValidationCondition.Simple(
         InitialHealth > 0,
         "Initial health must be greater than 0"
      ),
      ValidationCondition.IsSceneOfType<Foo>(SceneOfFooType)
   ];
   return conditions.ToGodotArray();
}
Note: Just like with GDScript, you do not need to add the [Tool] attribute to
Node scripts for this to work, so you can keep your gameplay code clean and
focused! However, if you want to validate a Resource script, you _will_ need
to add the [Tool] attribute to that script, due to engine limitations.
However, Resource scripts don't need to be guarded against running editor code
in runtime, so the [Tool] attribute should be all you need.
ValidationCondition
The core of Godot Doctor is the ValidationCondition class, which takes a
callable and an error message:
GDscript:
# Basic validation condition
var condition = ValidationCondition.new(
    func(): return health > 0,
    "Health must be greater than 0"
)
C#:
// Basic validation condition in C#
var condition = new ValidationCondition(
  () => health > 0,
  "Health must be greater than 0"
);
Optionally, you can also pass one of three severity levels (INFO, WARNING,
ERROR) as a third argument, which will adjust at what level of severity the
error is reported in the Godot Doctor dock:
GDscript:
# Validation condition with severity level
var condition = ValidationCondition.new(
    func(): return health > 0,
    "Health must be greater than 0",
    ValidationCondition.Severity.ERROR
)
C#:
// Validation condition with severity level in C#
var condition = new ValidationCondition(
  () => health > 0,
  "Health must be greater than 0",
  ValidationCondition.Severity.ERROR
);
Simple validations
For basic boolean validations, use the convenience simple() method, allowing
you to skip the func() wrapper:
GDscript:
# Equivalent to the above, but more concise
var condition = ValidationCondition.simple(
    health > 0,
    "Health must be greater than 0"
)
C#:
// Equivalent to the above, but more concise in C#
var condition = ValidationCondition.Simple(
  health > 0,
  "Health must be greater than 0"
);
Predefined common ValidationConditions
There's also a bunch of often-used validation conditions available as static
methods on the ValidationCondition class, such as is_scene_of_type,
is_instance_valid, is_string_not_empty, and more, which saves you time
writing common validation logic.
You can find them all in
the ValidationCondition class
Reuse validation logic with Callables
Using Callables allows you to reuse common validation methods:
GDscript:
func _is_more_than_zero(value: int) -> bool:
  return value > 0

var condition = ValidationCondition.simple(
  _is_more_than_zero(health),
  "Health must be greater than 0"
)
C#:
private bool IsMoreThanZero(int value)
{
  return value > 0;
}

var condition = ValidationCondition.Simple(
  IsMoreThanZero(health),
  "Health must be greater than 0"
);
Abstract away complex logic
Or abstract away complex logic into separate methods:
GDscript:
var condition = ValidationCondition.new(
  complex_validation_logic,
  "Complex validation failed"
)

func complex_validation_logic() -> bool:
 # Complex logic here
C#:
var condition = new ValidationCondition(
  ComplexValidationLogic(value),
  "Complex validation failed"
);

// C# implementation of the complex logic in a separate method
private static bool ComplexValidationLogicImplementation(int value) {
  // Complex logic here
};

// Wrapper function to return a Godot Variant from the implementation
private static System.Func<Variant> ComplexValidationLogic(int value) => () => ComplexValidationLogicImplementation(value);
Nested ValidationConditions
Making use of variatic typing, Validation conditions can return arrays of other validation conditions, allowing you to nest validation logic where needed:
GDscript:
ValidationCondition.new(
  func() -> Variant:
  if not is_instance_valid(weapon_resource):
  # We return false in case the weapon resource is null
  return false
  # or an array of this resource's conditions in case it is valid.
  return weapon_resource.get_validation_conditions(),
  "Weapon resource validation failed"
)
C#:
new ValidationCondition(
   () =>
   {
      if (IsInstanceValid(WeaponResource))
      {
         return WeaponResource.GetValidationConditions();
      }
      return false;
   },
   "Weapon resource is not valid."
)
IValidatable interface
The C# wrapper also includes a IValidatable interface that you can implement
on your C# scripts, which makes it easier to add validation conditions to your
script without needing to remember the exact method signature of
GetValidationConditions():
public partial class ExampleMyEnemy : Node, IValidatable
{
   /// <summary>The health value the enemy starts with.</summary>
   [Export]
   public int InitialHealth { get; set; } = 120;

   /// <summary>The maximum health value the enemy can have.</summary>
   [Export]
   public int MaxHealth { get; set; } = 100;

   public Array GetValidationConditions()
   {
      ValidationCondition[] conditions =
      [
         ValidationCondition.Simple(
            InitialHealth <= MaxHealth,
            "Initial health should not be greater than max health."
         ),
      ];
      return conditions.ToGodotArray();
   }
}
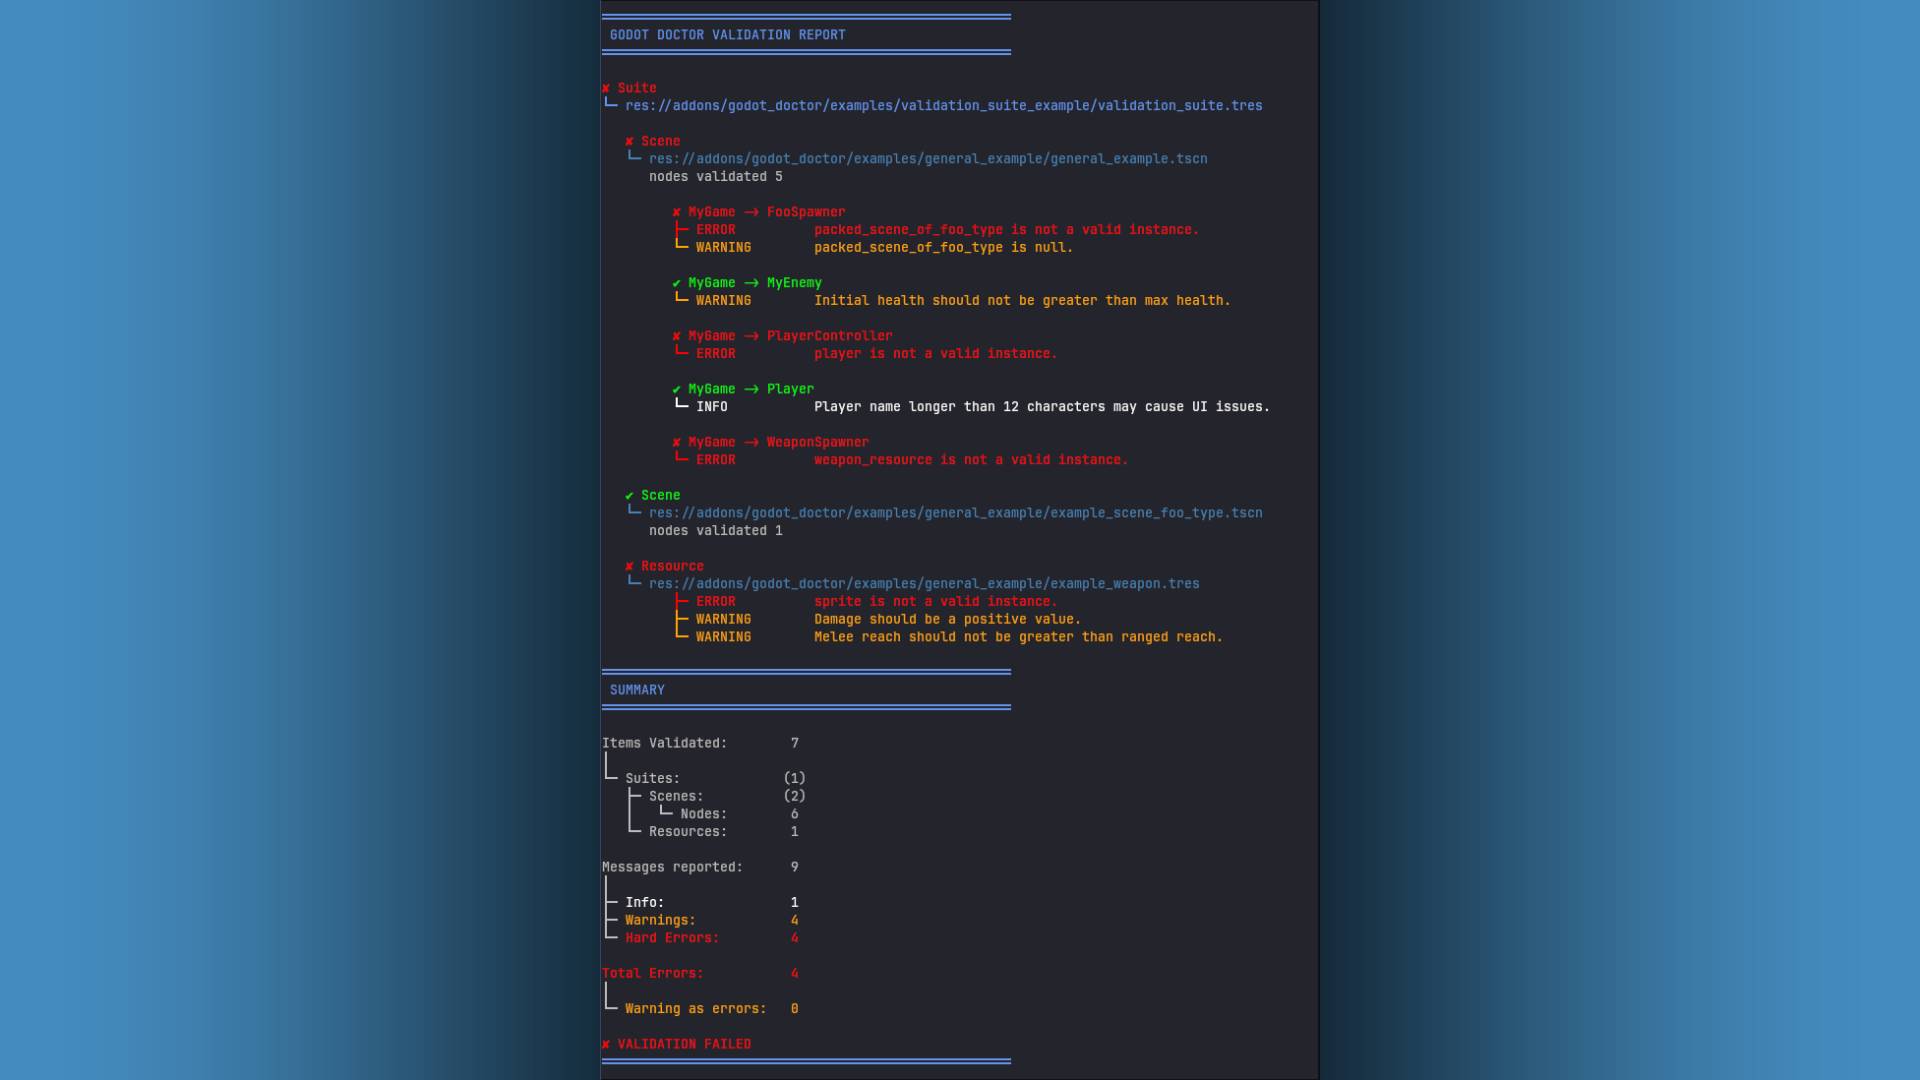
Running Godot Doctor on the CLI
Godot Doctor can be run from the command line, allowing you to integrate it into your CI/CD pipeline or run it as a standalone validation tool. While using it in the editor provides real-time feedback, running it on the CLI can be useful for automated checks during development or before commits, ensuring your entire project adheres to your validation rules.
To run Godot Doctor on the CLI:
- Create a
GodotDoctorValidationSuiteresource in your project. By default, it will generatively collect _all_ scenes and resources in your project. You can also exclude specific scripts or directories in the suite asset from this collection process, or create multiple custom validation suites that only validate specific scenes or resources.ℹ️ There is an example that goes more in depth on how to set up validation suites.
- Assign the suite resource to the
validation_suitesproperty of theGodotDoctorSettingsresource (addons/godot_doctor/settings/godot_doctor_settings.tres). - run Godot Doctor on the CLI, use the following command:
godot --headless --editor --quit-after 30 -- --run-godot-doctorℹ️ The
--quit-after 30flag is used to ensure that Godot exits after 30 seconds, just in case there the plugin doesn't initialize properly. You can adjust this timer as needed.
The output is presented in a tree structure, making it easy to identify which scenes and nodes have validation issues:
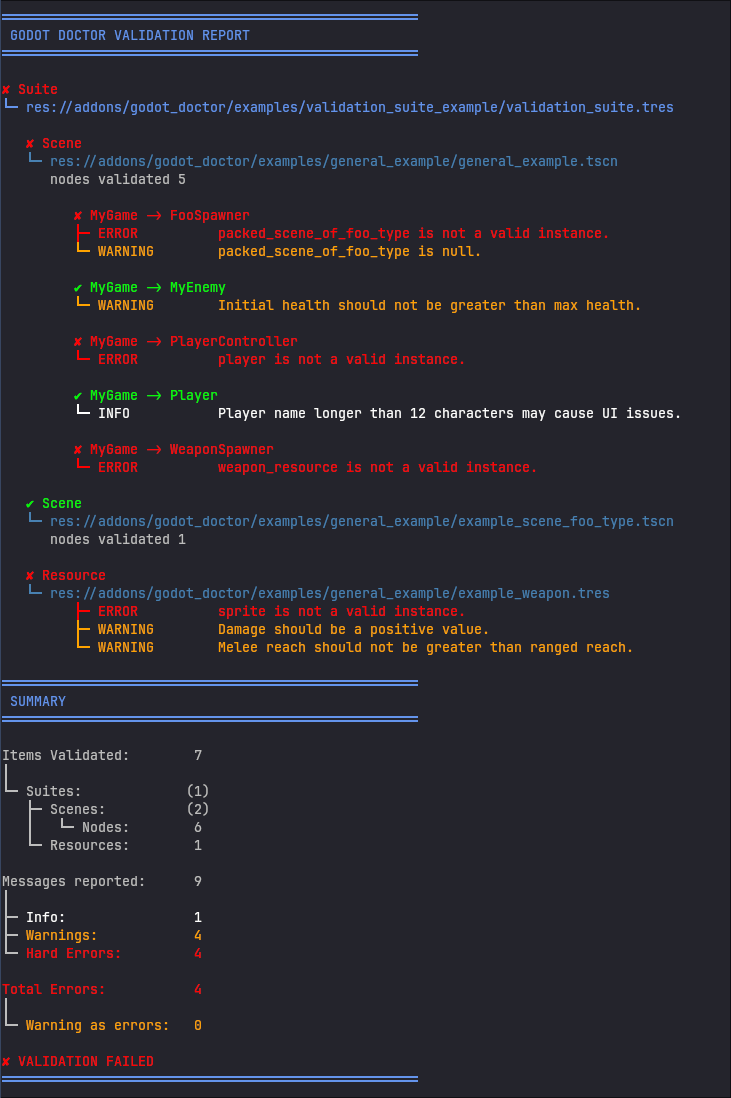
The CLI output exits with a non-zero status code if any validation conditions fail, making it easy to integrate into CI/CD pipelines.
CI/CD integration
You can integrate Godot Doctor into your CI/CD pipeline (e.g., GitHub Actions, GitLab CI, Jenkins) to automatically validate your project on every push or pull request. This helps catch issues early and maintain code quality across your team.
An example GitHub Actions workflow may look like this.
Placing this file at .github/workflows/godot_doctor.yaml in your repository
will set up the workflow to run on every push and pull request, installing
Godot, importing the project, and executing Godot Doctor in headless mode. If
any validation conditions fail, the workflow will exit with a non-zero status,
causing the check to fail and alerting the developers to the issues that need to
be addressed.
You can setup GitHub to require this check to pass before allowing pull requests to be merged, ensuring that all code merged into your main branches adheres to your validation rules.
Generating a JUnit-like XML Report
In addition to the console output, you can configure Godot Doctor to generate a JUnit-like XML report of the validation results. See here for more info.
How it works
- Automatic Discovery: When you save a scene, Godot Doctor scans all nodes
for
@exportproperties and a_get_validation_conditions()method - Instance Creation: For non-
@toolscripts, temporary instances are created to run validation logic - Condition Evaluation: Each validation condition's callable is executed
- Error Reporting: Failed conditions display their error messages in the Godot Doctor dock
- Navigation: Click on errors in the dock to navigate directly to the problematic nodes
Examples
There are many examples available that help you better understand how to use Godot Doctor in your project, and how to write validation conditions for different use cases. You can find them all in the examples README.
Installation
- Copy the
addons/godot_doctorfolder to your project'saddons/directory - Enable the plugin in Project Settings > Plugins
- The Godot Doctor dock will appear in the editor's left panel
use_default_validationsis on by default in the settings resource (addons/godot_doctor/settings/godot_doctor_settings.tres), so it will start reporting any of the default validations as soon as you save a scene.- Start adding custom validations by adding a
_get_validation_conditions()method to your scripts, then save your scenes to see validation results!
License
Godot Doctor is released under the MIT License. See the LICENSE file for details.
Attribution
If you end up using Godot Doctor in your project, a line in your credits would be very much appreciated! 🐦 (though not required)
Changelog for version 2.2.0
2026-07-23 10:42:05
No changelog provided for this version.